Making the churches.
I have explained in a previous blog the challenge of making the tower for the church models. The rest of the commission proved to be equally difficult.
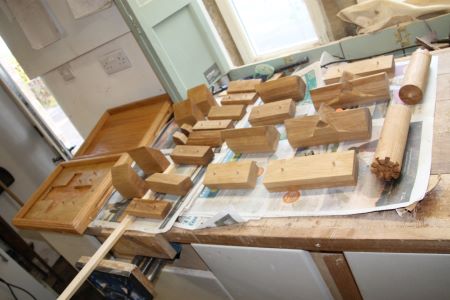
The blocks were made by laminating timber, this was done to reduce the risk of the thick blocks splitting due to tension in the material. Perhaps I did not give the process enough thought, because when I came to shape the crossing, I found I had grain running in opposite directions which made shaping the roof where multiple angles meet a major problem. Thanks to a Sorby pro edge sharpening system I managed to get my chisels razor sharp and shaped the crossings and the multiple roof angles involved.
The chancel was relatively easy as it had no angled joints. The nave was fashioned to match in to the roof section of the crossing, then the side aisles were shaped. Not only had they to match the eaves height of the nave but had to marry up to the roof of the crossing.
Base board.
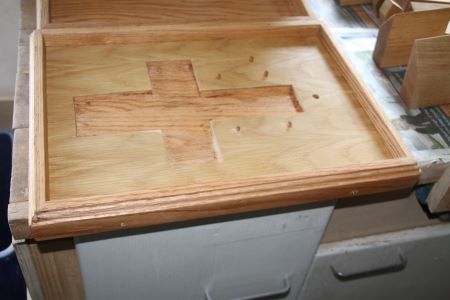
The client had asked for a tray of sorts to allow for storage of the model and for people to use as a starting point for assembly. I decided to rebate the nave, crossing and chancel in to the board and attach side aisles, porch and tower using dowel pegs.
I used a 15mm thick oak panel as the base with a layer of 6mm oak faced ply to start the rebate. A quick trip round the ply with a jigsaw gave me a template so I could make the recess deeper in to the oak.
Dowels were then added for the side aisles and the porch. and a hole made to accommodate the dowel already projecting from the bottom of the tower.
The original brief was that the model should be in multiple pieces, all interchangeable, so I split the side aisles, crossing and nave horizontally, but at different heights, resulting in a total of 12 parts for each model. Dowel pegs were added all at the same spacing so it was possible to assemble the model 'incorrectly'. the locating holes were then enlarged so the parts were loose fit to avoid any damage with repeated use.
This procedure was repeated for both models so all parts were interchangeable. All the parts and the trays were then sanded multiple times, roofs checked for alignment, then the models oiled and waxed to finish.
Thanks to Dan at info point for asking me to be involved in this project. Not the easiest thing I have done but satisfying now it is finished.
Get in Touch
Call 07710 888611, or email mrhwoodwork@outlook.com.


